
For proper working of a Mac system, it is necessary to ensure that the hard drive is up to date and free from all type of errors and malfunctioning. In general sense, Mac hard drives are very reliable and most likely you won’t face any physical problems until the drive has been dropped or broken through other means. In such case, the motion sensor existing on the Mac OS X will park the drive read/write heads to minimise the chance of damage.
But, nevertheless, it is always helpful to regularly check the drive status and run few benchmark tests, along with defragging the drive at regular interval of time. It will make sure that the file and folder structure of the drive remains well-optimized. It will help in improving the boot time and also removing the bad blocks from the HD.
Check your Mac Hard Drive Health
The very first thing which you need to do is check the hard drive’s health status. This can be done by a process known as disk verification and quite easy to do: -
Note: The above process is applicable up to the Disk Utility running on OS X 10.10 and below versions. On OS X 10.11 and later, Disk Utility possess only the “First Aid” button which verifies and repair Mac hard disk drives.
After a period, you will look a Windows populating with a message about your Mac hard drive health report that gives you a complete description of all the things. Those things which appear in red will give you a message there is something wrong with your Disk Utility.
You will see the below screenshots
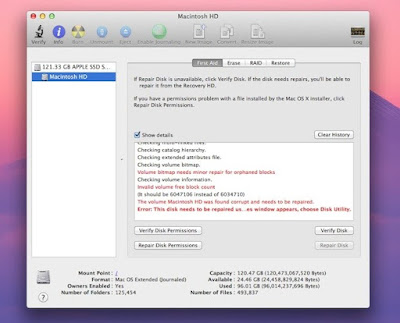
If you see a red message prompting an error, “Error: This disk needs to repair”, you can easily choose to click on the ‘Repair Disk’ button to start the disc fixing process. It works for both internal as well as an external drive.
If the drive in question is your boot drive, then you will find the ‘Repair Disk’ button inaccessible. It doesn’t imply that you can’t fix your boot drive, but it requires an additional step which we discuss in some next article.
Repair a Boot Drive using the help of Disk Utility: - In such scenario, you need to reboot into the Recovery Partition and then need to repair disk.
Note: - Before starting, make sure you have Mac backup available with your Time Machine. Now, let’s start with the procedure step by step: -
Once the Repair Disk has run successfully, you can easily boot your Mac OS X as usual, and all the drive issues can be resolved quickly.
Final Note from Author
If despite implementing the above methods, you don’t see any difference in your Mac hard drive performance or fails to repair the file system, then, you need to take the help of a 3rd party commercial applications like Stellar Volume Optimizer Software. This software is helpful in repairing corrupt Mac hard drive and rebuilding the disk directory structure. In addition to this, it also fixes certain other Mac drive errors and acts as the best volume repair tool.
Meanwhile, if you face any problems, then please let us know it via the comment section.
But, nevertheless, it is always helpful to regularly check the drive status and run few benchmark tests, along with defragging the drive at regular interval of time. It will make sure that the file and folder structure of the drive remains well-optimized. It will help in improving the boot time and also removing the bad blocks from the HD.
Check your Mac Hard Drive Health
The very first thing which you need to do is check the hard drive’s health status. This can be done by a process known as disk verification and quite easy to do: -
- Open Disk Utility which can be found in the /Application/Utility folder of your Mac.
- Here, you need to select your hard drive from the left-hand side of menu and then need to click on the ‘First Aid’ tab.
- Click on the ‘Verify Disk’ from the lower hand side and let it run for some period.
Note: The above process is applicable up to the Disk Utility running on OS X 10.10 and below versions. On OS X 10.11 and later, Disk Utility possess only the “First Aid” button which verifies and repair Mac hard disk drives.
After a period, you will look a Windows populating with a message about your Mac hard drive health report that gives you a complete description of all the things. Those things which appear in red will give you a message there is something wrong with your Disk Utility.
You will see the below screenshots

If you see a red message prompting an error, “Error: This disk needs to repair”, you can easily choose to click on the ‘Repair Disk’ button to start the disc fixing process. It works for both internal as well as an external drive.
If the drive in question is your boot drive, then you will find the ‘Repair Disk’ button inaccessible. It doesn’t imply that you can’t fix your boot drive, but it requires an additional step which we discuss in some next article.
Repair a Boot Drive using the help of Disk Utility: - In such scenario, you need to reboot into the Recovery Partition and then need to repair disk.
Note: - Before starting, make sure you have Mac backup available with your Time Machine. Now, let’s start with the procedure step by step: -
- Reboot your OS X and hold down the Command+R button from your keyboard.
- Now, choose the ‘Recovery HD’ from your boot menu bar.
- Here, you need to select the ‘Disk Utility’ from the OS X Utility screen.
- In the final step, click on the HD that report the drive error and then click on the ‘First Aid’ tab and finally click on the ‘Repair Disk’ button to solve the issue.
Once the Repair Disk has run successfully, you can easily boot your Mac OS X as usual, and all the drive issues can be resolved quickly.
Final Note from Author
If despite implementing the above methods, you don’t see any difference in your Mac hard drive performance or fails to repair the file system, then, you need to take the help of a 3rd party commercial applications like Stellar Volume Optimizer Software. This software is helpful in repairing corrupt Mac hard drive and rebuilding the disk directory structure. In addition to this, it also fixes certain other Mac drive errors and acts as the best volume repair tool.
Meanwhile, if you face any problems, then please let us know it via the comment section.